Overview
Launching a new campus is an exciting time for your church! Most departments have a part to play in the transition, and the team administering Rock is no different.
One to Multiple Campuses
The transition from one campus to multiple campuses will take the most time because there are likely many features, metrics, and workflows designed with one campus in mind. Also, you'll want to take the time to review people and groups to make sure they have a campus set (where applicable).
This is a great time to reevaluate the current structure of your instance and potentially make some shifts for things like group hierarchy and entity categories. We cover these types of ideas in sections below with examples.
Add to Multiple Campuses
If you already have multiple campuses, this transition will likely be simpler for your team. There’s a good chance you’ve already gone through the process before and have experience with all the places that may need attention. Below are reminders and potential additions to add to your checklist when creating another campus for your church.
Campuses
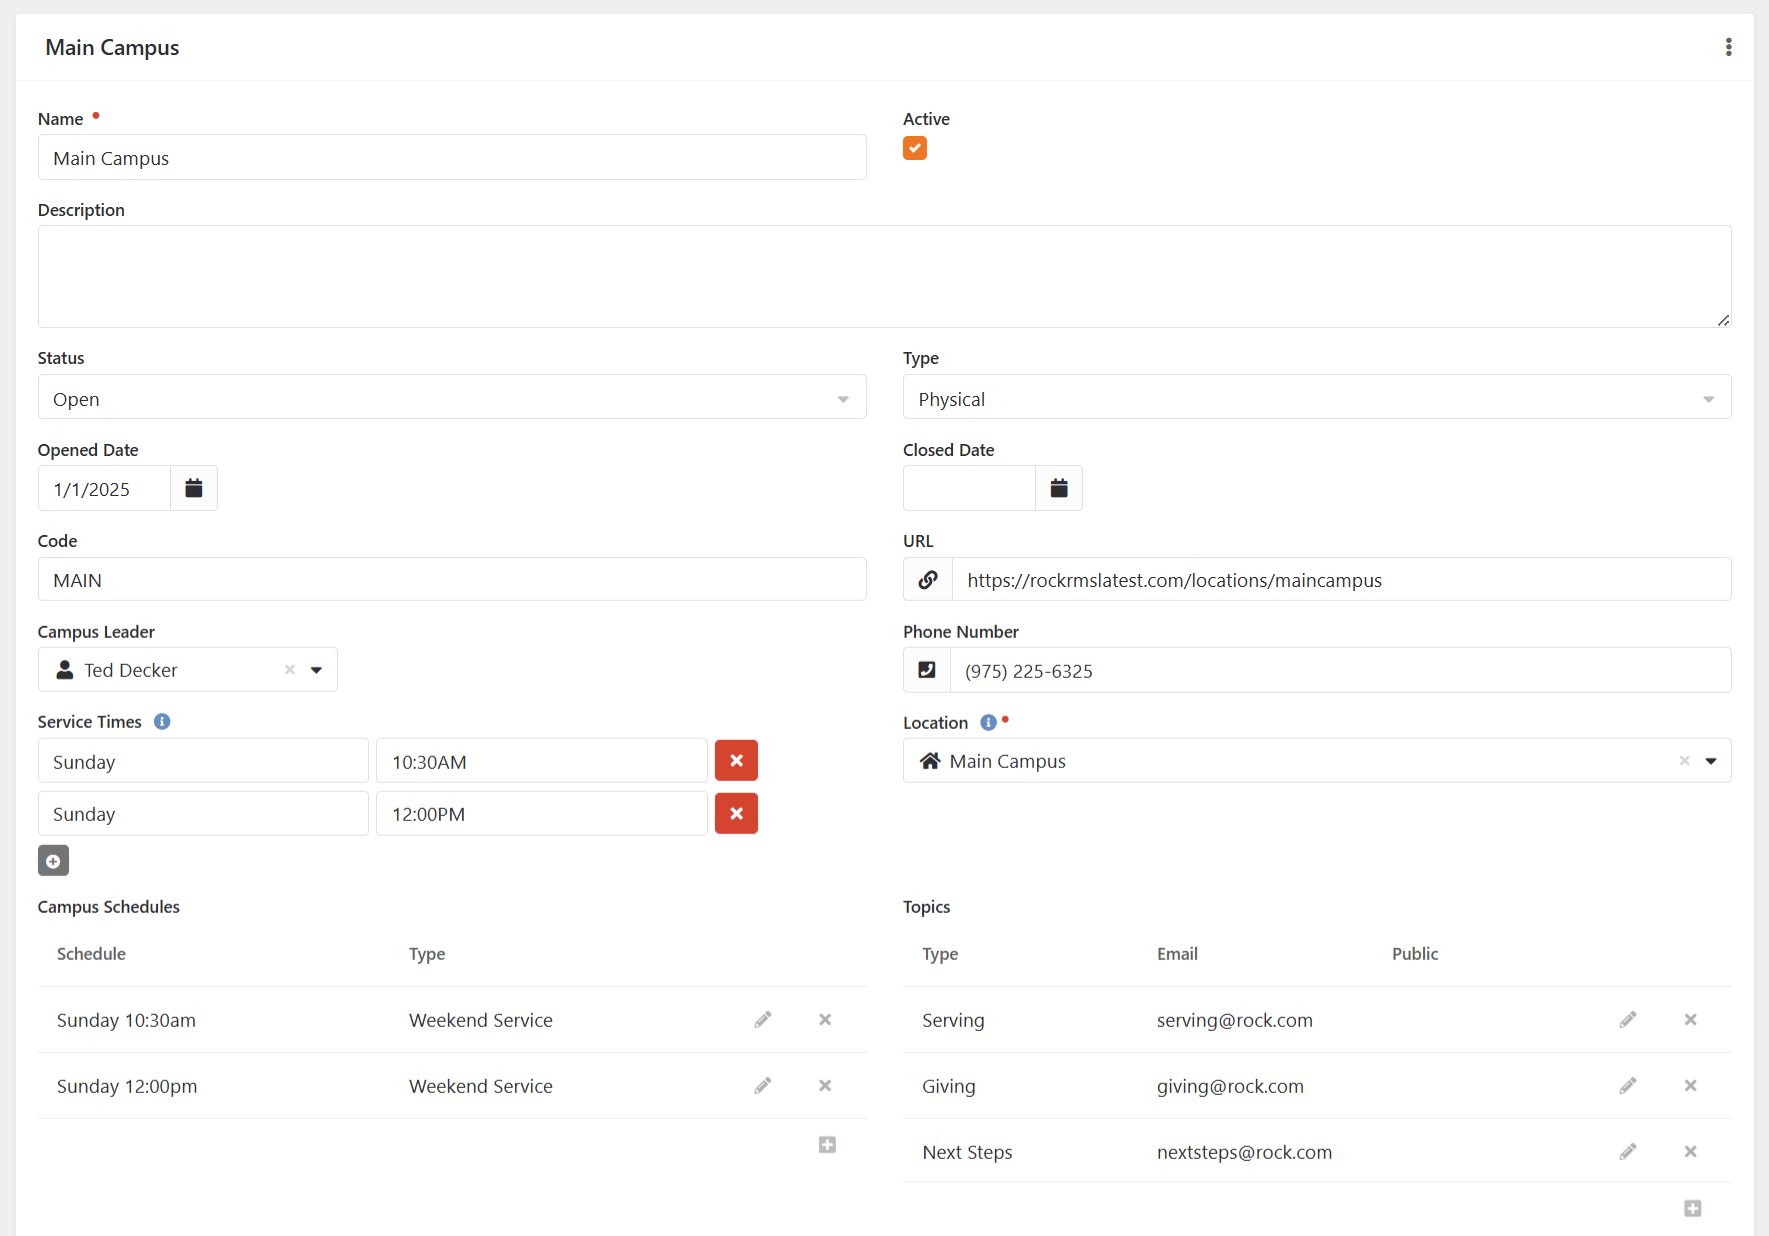
You’ll need to add the new campus to your Campuses list. We recommend adding as much information as possible, so you are able to reference campus information more easily. A few specifics we like to call out include:
- Campus Topics: Setting up emails per campus can make updates with staff changes much simpler! For example, instead of updating multiple workflows to use a different email per campus, you can set the email to use a specific campus topic email.
- Campus Schedules: This creates a simple reference for use on other pages (such as your external site’s Locations page) so that if services are changed, it only needs to be updated on the campus.
- Campus Team: Adding roles and group members can help centralize assignments rather than hard-coding values for workflows and connection processes.
Locations
New locations will be needed for the new campus, starting with the actual campus’ location. Once that is created, other locations can be added underneath it for kids' rooms, classrooms, etc. These are needed to set up the new check-in kiosks.
Check-in
As you know, there are many pieces to set up check-in. While you will build off previous configurations, there are multiple steps for making sure your new campus is set up for check-in.
Devices
New kiosk devices will be needed with the new campus location set. This will allow for locations under the new campus to show as options for check-in.
Depending on your printer strategy, you may also need to add new Printer Devices for the new check-in stations as well.
Schedules
If the new campus has different schedules, those will need to be created. However, there’s a good chance the current schedules will be all that is needed for normal weekend check-ins.
Check-in Configuration
Below we have recommendations based on a couple of the standard configurations, but you’ll want to make sure to review all your configurations where the new campus will be used.
- Children’s Check-in: You’ll need to add the new locations to the age/grade groups. Then, you’ll need to be sure to set the schedules for all of the new locations.
- Volunteer Check-in: As you’re creating the new Volunteer groups, you’ll need to set the Meeting Details for the appropriate location and schedule combinations.
Special Note: We recommend testing this extensively before the Go-Live date. There are always many combinations of locations, schedules, and groups, and we know how important efficient and correct check-in is during busy weekend services! If possible, a soft-launch that will replicate real weekend attendance and check-in needs with bought-in grace-filled volunteers will provide the best testing feedback.
Metrics
Metric configuration can vary widely, but we have a few tips for consideration.
- If metrics do not currently have a Campus partition, we’d recommend adding one. This allows for reporting by campus for the metric.
- This would be the time to update previous metrics to set campus as well.
- If a metric is added via SQL or Lava, review the sources to ensure campus is accounted for. You may also need to check if the new locations or schedules created for the new campuses need to be added to the source.
- Review Metric Entry blocks to check that the new campus is showing with correct schedules and metric entry options.
Groups
Groups are a huge part of Rock, and as your church grows, you’ll want to ensure your group structure is scalable and conducive to reporting, replication, and security.
Structure Notes
Generally, for multi-campus churches, we recommend standardizing their ministries as child group (and child group types) under a top-level Campus group structure. This might look like:
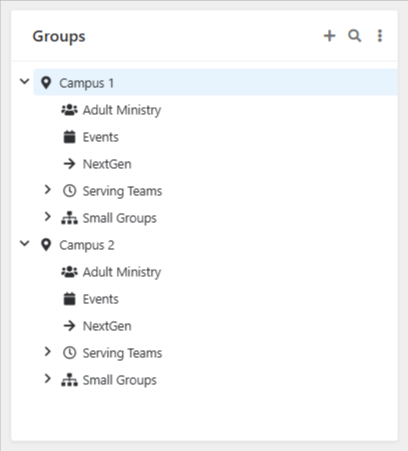
This structure allows each campus, as they're added, to have their own groups within an already-familiar structure. However, each church works differently, and you may have good reasons to use an alternative structure.
New Groups
Regardless of the structure, you will need to create new groups for the new campus. Keep in mind that most places where groups are selected will show the typical hierarchical view so you can see the associated campus, but that is not always the case. Consider adding the campus abbreviation to the end of the group name in a patterned way, such as “[Group Name] - CMP”. This will allow you to remove the abbreviation when displaying for reporting, lava templates, etc.
As groups are created, be sure to set the campus and consider group security. This will be important to check if you copy the original group structure and are not prompted during group creation.
Group Finder
Additionally, if any Group Finder blocks are being used, those should be reviewed to consider showing the Campus filter if it is not already being used.
External Site
Campus information is likely shown on your External Site and may include service times, address, an image, etc. Typically, that information is best pulled by using the Campus properties/attributes, but in case the information is not, the page may need to be manually updated.
Also consider how the differences between campuses are shown. For example, one campus may not provide Student Ministry, but other campuses do. Another example would be making sure if one campus has an image that all campuses do; otherwise, visitors may not have a balanced view of which campus to attend.
Finance
Typically, main giving accounts have a campus set so that they can be used for reporting and to potentially update a family's campus. In this case, a new account will need to be created that is associated with the new campus.
Depending on your giving partner, there’s a good chance you’ll need to reflect this addition in their system as well.
Additionally, setting up campuses on accounts will provide options for a campus mapping strategy to better utilize
features like Giving Alerts and launch campus-specific processes.
Workflows
Workflows can be used in so many places; they can become time consuming to manage if not set up to be scalable in the first place. One main example for one-campus churches going to multiple campuses is that you may not have included gathering a person’s campus at all in forms.
This process will take time, but we’d recommend reviewing your workflows for the following:
- Check that Person Entry and other forms are showing a campus field and will update the family’s campus based on their selection.
- Update workflows that are using a specific email address to use something dynamic, like Campus Topic or Campus Role.
Then, the next time a campus is added, your workflows will not need much, if any, attention!
Connections
A new campus will need a few different connection updates. For each connection opportunity that will be used by the new campus, you will need to:
- Enable the new campus on the opportunity.
- Set a default connector (where applicable).
- Add placement groups (where applicable).
If you have current connection requests that will need to be
reassigned, the Bulk tool for connections can help quickly reassign them.
Opportunity Finder Block
If the Connection Opportunity Finder block is used to search and sign up for an opportunity, it should be reviewed for the Campus filter. Typically, this is a good filter to turn on once you have multiple campuses.
Events
Between Calendar Event Occurrences and Event Registrations, there could be several new items to create for the new campus.
Event Occurrences will need to be created for your events that occur at the new campus. Likely, this would include events like Baptism.
Depending on how the Event Registrations are created, there may need to be new Registration Instances created for the new campus. Additionally, you’ll want to review Registration Template forms to either add or update to use the Campus field type to capture a person’s campus.
Communications
Common places we see campus-specific communication-related features include:
- System Phone Numbers: Your campuses may have a specific phone number that needs to be added.
- Communication Lists: Your campuses may have individual communication lists for subscribing to, and therefore, a new one needs to be created.
- Communication Segments: Adding a segment for each campus allows non-campus communication lists to be tailored to only the campus selected.
Security
If your team uses campus-based security roles, a new security role will need to be created.
Reporting
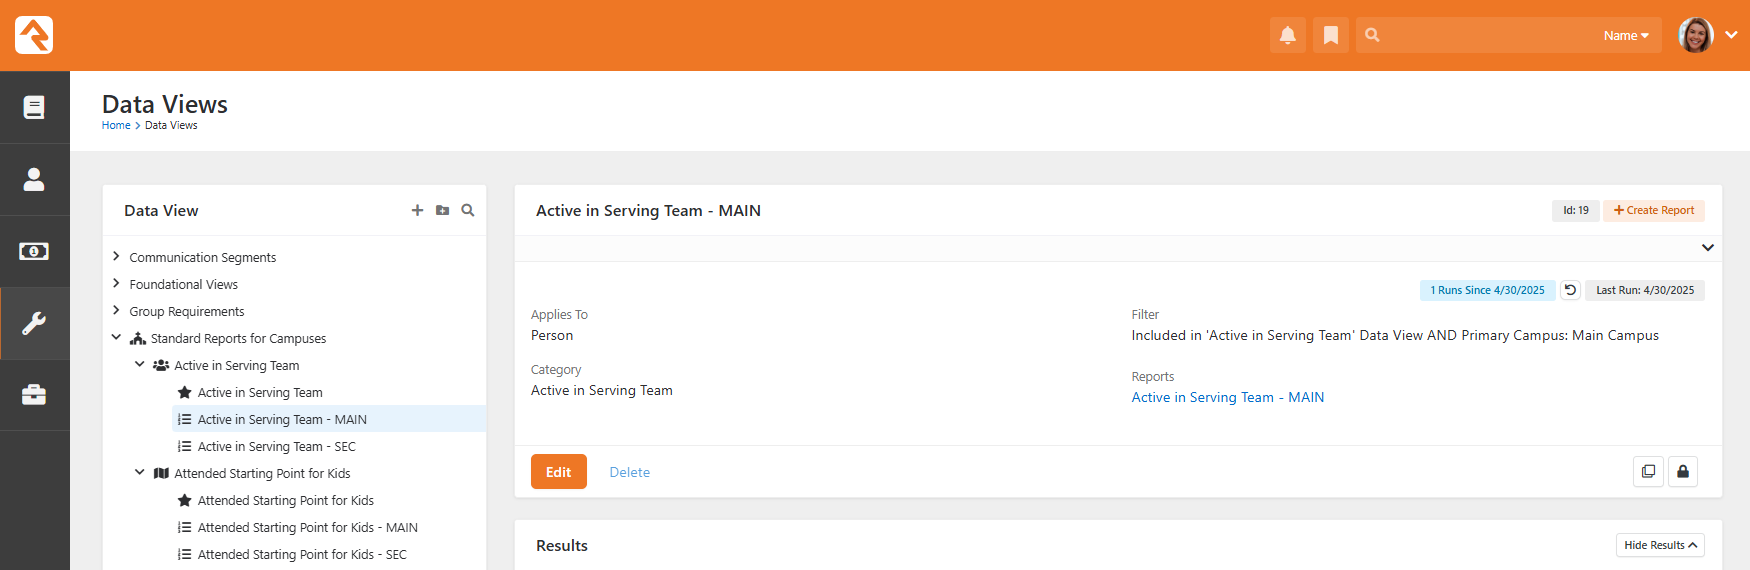
Your church likely has data views and/or reports that are campus specific. If this is the case, you’ll need to create new ones.
A strategy we’d recommend for data views is creating a “Master” data view that has all the needed filters except campus and then creating “Child” data views for each campus that references the “Master” and adds the primary campus filter. This is much more efficient when you need to change filter criteria!
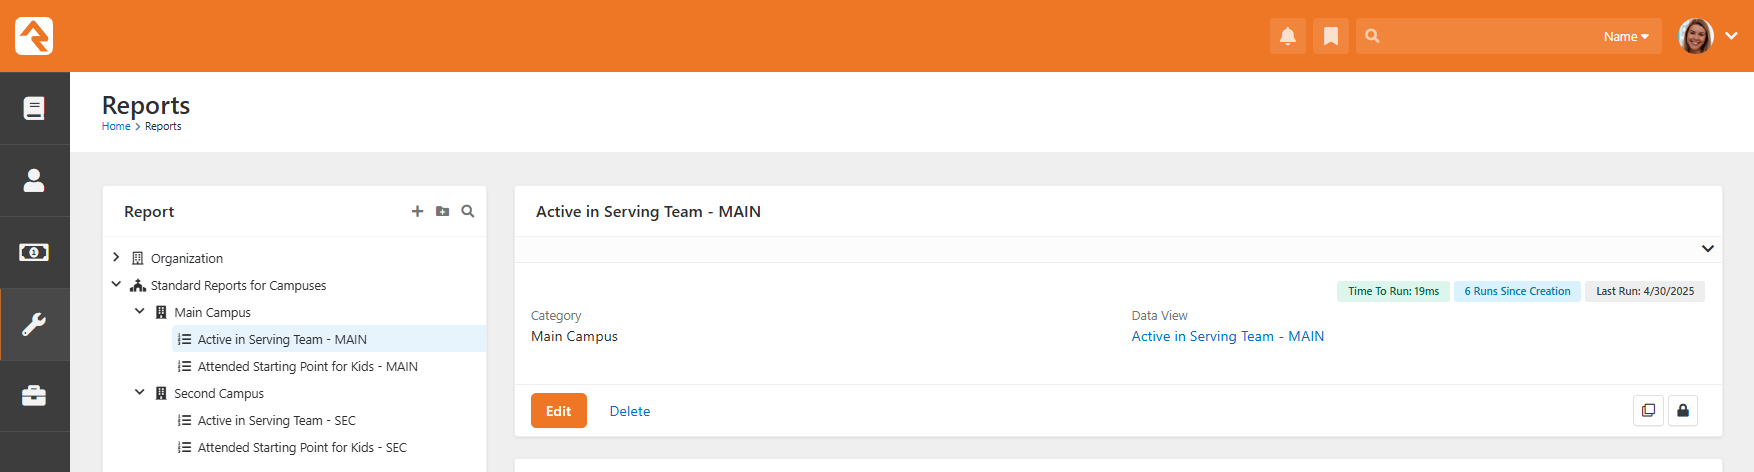
Another consideration would be to create campus categories to help organize reports further. An example use case is below for a Campus Dashboard using this setup. This could look like creating a parent category “Standard Reports for Campuses” and then a child category for each campus.
Campus Dashboard
One handy new page that would be valuable as you launch new campuses would be a Campus Dashboard. This type of dashboard can be a key tool for campus staff and executive teams to review relevant recent metrics and provide a centralized location for the most-used reports and tools the team needs to function well.
Below lists potential sections for the dashboard.
- KPIs: Display data that is important for the campus staff and executive teams to see at any easy glance.
- Actions/Page Links: Show links to dynamic reports, connection boards, workflow entries, etc. Include the use of badges to show items that need attention.
- Groups: Associated groups for the campus (Note: this would be if each campus had their own group structure as mentioned in the Groups section).
- Reports: Reports created with a category set to the campus (Note: this would be using the setup mentioned in the Reporting section).